Shower mold is the most common mold complaint homeowners deal with — and also one of the most manageable when caught early. Surface mold on tile and grout is a DIY fix. Mold behind the wall is not.
Here’s how to tell the difference and handle it correctly.
Before You Start: Surface Mold vs. Wall Mold
The treatment depends entirely on where the mold is.
Surface mold (DIY-safe) grows on:
- Grout lines between tiles
- Silicone caulk along the tub or shower floor
- Tile surface itself
- Shower door tracks and seals
Wall mold (needs a pro) shows up as:
- Musty smell that persists after cleaning
- Soft, spongy, or discolored drywall outside the shower
- Tiles that feel loose or hollow when tapped
- Recurring black staining in the same spot despite repeated cleaning
If you’re seeing soft walls or persistent musty odor, skip to the FAQ below about when to call a professional.
What You’ll Need
- N95 respirator
- Rubber gloves and eye protection
- White vinegar (for general mold)
- Stiff grout brush or old toothbrush
- Baking soda
- Oxygen bleach powder (OxiClean) or commercial mold stain remover
- Utility knife (for caulk removal)
- 100% silicone caulk + caulk gun
Step-by-Step: Cleaning Shower Mold
Step 1 — Identify the Mold Type and Extent
Look carefully before grabbing a cleaning product. Pink or orange slime is Serratia bacteria, not mold — treat it with a disinfectant bathroom cleaner. Black or green spotting in grout and caulk is the typical surface mold that vinegar and scrubbing handle well.
If mold covers more than 10 square feet, smells strongly musty even after cleaning, or the drywall around the shower is soft or discolored — stop and call a mold remediation professional. You’re likely dealing with wall mold.
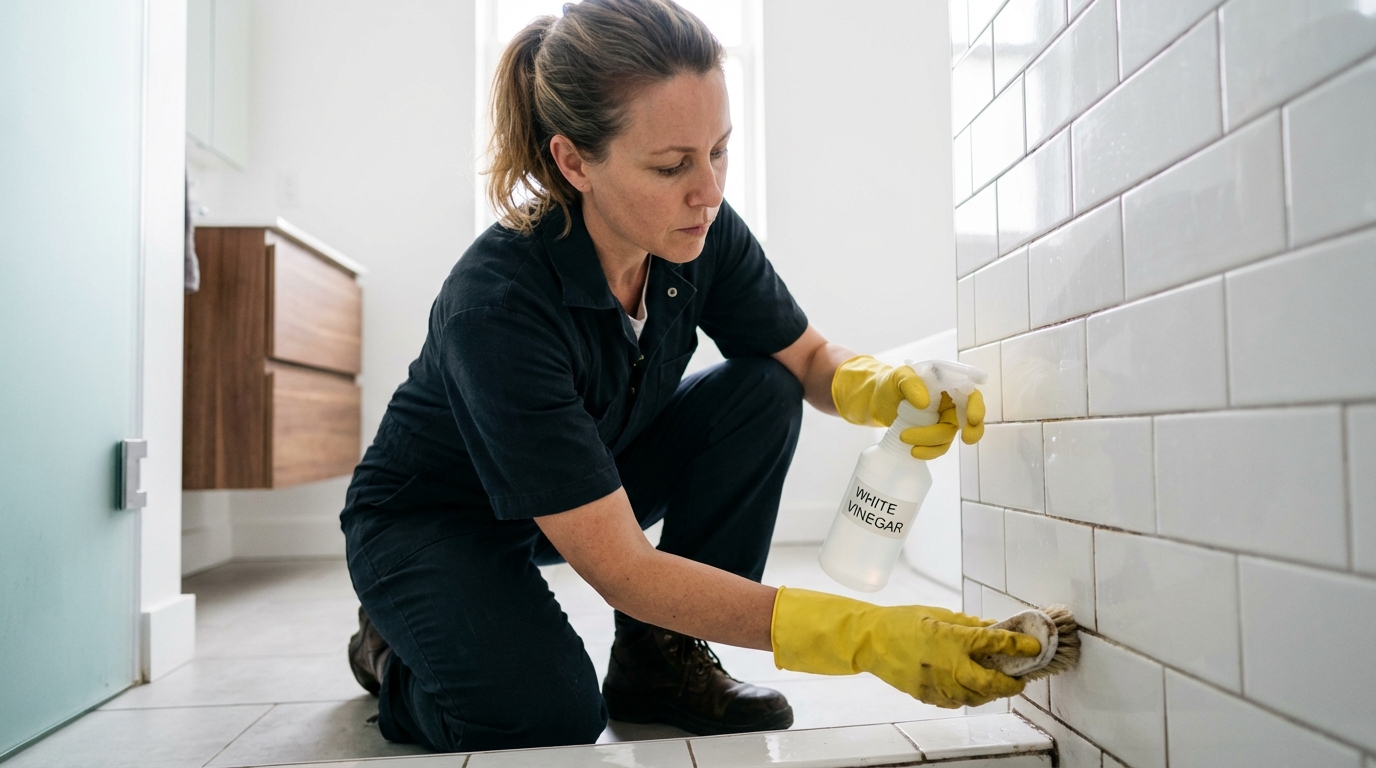
Step 2 — Ventilate and Protect Yourself
Open the window, run the exhaust fan, and close the bathroom door. Wear your N95, gloves, and eye protection. Mold spores disturbed during cleaning are the main exposure risk — containment matters even for small jobs.
Step 3 — Apply Your Cleaning Solution
For grout: Spray undiluted white vinegar directly on the moldy grout lines. Let it sit 30 minutes. Vinegar’s acidity kills mold and penetrates grout better than bleach.
For heavy staining: Mix 3 parts baking soda to 1 part water to form a paste. Apply to grout, let sit 10 minutes, then scrub.
For caulk: Use an oxygen bleach gel or commercial mold stain remover (brands like RMR-86 or Mold Armor work well). Apply, let sit 10–15 minutes. Do not use liquid bleach on caulk — it evaporates too quickly to penetrate.
Step 4 — Scrub and Rinse
Work with a stiff grout brush in tight circular motions. Rinse with hot water and wipe clean. Apply a second round if staining persists. Thorough rinsing matters — don’t leave cleaning solution sitting on chrome fixtures or colored grout.
Step 5 — Treat Stubborn Tile Staining with Diluted Bleach
If vinegar doesn’t remove the staining from glazed ceramic tile (not grout), mix 1 cup bleach in 1 gallon water, spray on, wait 5–10 minutes, scrub, and rinse completely.
Important limits: Never use bleach on natural stone (marble, travertine, slate) — it etches the surface. Bleach kills surface mold on tile but doesn’t penetrate grout deeply; staining often returns.
Step 6 — Replace the Caulk
Mold in caulk cannot be fully cleaned. Mold grows into the silicone matrix and cannot be scrubbed out. Cleaning temporarily removes surface discoloration, but the mold always comes back.
The fix: remove the old caulk with a utility knife, clean the joint thoroughly with vinegar, let it dry completely (24–48 hours minimum), and apply fresh 100% silicone caulk (not latex). Silicone resists mold and moisture far better than latex caulk.
Step 7 — Fix the Moisture Source
This is the step most people skip, and why shower mold keeps coming back. Mold needs moisture. Without fixing the moisture, it returns within weeks.
Ventilation fixes:
- Upgrade to a higher-CFM exhaust fan if yours is old or underpowered (aim for at least 50 CFM; 1 CFM per square foot of bathroom)
- Run the fan for 20 minutes after you finish showering, not just during
- Leave the shower door or curtain open when not in use to allow drying
Maintenance fixes:
- Squeegee tile after every shower — this alone dramatically reduces mold recurrence
- Reseal grout annually with a penetrating silicone grout sealer
- Fix any dripping fixtures or slow leaks immediately
Cleaning Products Compared
| Product | Best For | Penetrates Grout? | Safe on Stone? |
|---|---|---|---|
| White vinegar | General mold, grout | Moderate | Yes |
| Baking soda paste | Staining, scrubbing aid | No | Yes |
| Oxygen bleach (OxiClean) | Heavy grout staining | Better than chlorine bleach | Yes |
| Chlorine bleach | Surface mold on tile | No | No |
| Mold stain remover (RMR-86) | Deep set staining | Moderate | No |
| Hydrogen peroxide (3%) | General mold | Moderate | Yes |
Never mix vinegar and bleach — the combination produces toxic chlorine gas.
Other Surfaces: Curtain, Liner, and Ceiling
Shower curtain and liner
Fabric shower curtains with visible mold can often be machine washed — check the label. Add 1 cup of white vinegar to the wash cycle along with a small amount of detergent. Wash in warm water and air dry; high dryer heat can damage the fabric.
Plastic shower curtain liners are cheaper to replace than to clean thoroughly. If mold has developed beyond the lower few inches, replacement is the practical choice. A liner costs $5–$15 and mold won’t penetrate a new one for months with regular ventilation.
Bathroom ceiling
Mold on the ceiling directly above the shower is almost always a ventilation problem — steam rising from the shower condenses on a cooler ceiling surface. The fix requires both cleaning and improving airflow.
To clean: mix 1 cup bleach per gallon of water, apply with a sponge on an extended handle or a spray bottle, let sit 10 minutes, and wipe clean. Use eye protection — ceiling application drips. If the ceiling is painted drywall, be gentle; if it’s peeling, the drywall underneath may be compromised and need replacement.
To prevent recurrence: the ceiling will mold again if the exhaust fan is undersized, positioned poorly, or venting into the attic rather than outside. Confirm your fan vents to the exterior.
Metal fixtures and faucets
For chrome, brushed nickel, or stainless: use a soft cloth with diluted dish soap or white vinegar — avoid abrasive scrubbers that scratch the finish. For the crevices around the base of faucets where they meet the tile or tub deck, a stiff toothbrush with vinegar works well. Bleach is safe on chrome but can discolor brushed nickel over time; test in an inconspicuous spot if unsure.
DIY vs. Professional Mold Removal
| Situation | DIY | Call a Pro |
|---|---|---|
| Grout and caulk mold | ✓ | — |
| Mold on tile surface | ✓ | — |
| Mold on shower door tracks | ✓ | — |
| Mold covers >10 sq ft | — | ✓ |
| Mold behind wall (soft drywall) | — | ✓ |
| Musty smell won’t clear | — | ✓ |
| Mold recurs within days | — | ✓ |
| Respiratory symptoms at home | — | ✓ |
If you’re unsure which category you’re in, our free mold assessment quiz can help you decide.
When Shower Mold Becomes a Health Issue
Most shower mold — Cladosporium, Penicillium, Aspergillus — is a significant allergen but not acutely dangerous for healthy adults during brief cleaning exposure. The main risks:
- Asthma and allergy flare-ups — common with prolonged mold exposure
- Respiratory irritation — from disturbing spores during cleaning
- Serious illness — for immunocompromised individuals, even common molds can be dangerous
Stachybotrys (“black mold”), the species associated with serious health effects, requires chronic water saturation to grow — it’s slow-growing and needs soaked drywall or wood to establish. If your shower mold appears black and there’s any indication of long-term moisture intrusion, professional testing is warranted before you disturb it.